TECHNICAL INFORMATION
TECHNICAL INFORMATION
This page is part of the old GMCWS.org web site and is not being updated - please go to www.gmcws.org for current information.
|
|
|
|
|
|
|
|
|
|
|
...and our disclaimer...What you do to your coach is your business. Neither the authors or GMC Western States assume any responsibility for what you choose to do to your coach.
If you haven’t replaced rubber fuel lines in the last two years and you drive in an area that uses Reformulated Gasoline (oxygenated with MTBE or ethonal) you might want to inspect them for softening or swelling. The Society of Automotive Engineers (SAE) has current specifications for resistant hose; SAE 30 R9 and SAE 30 R7. The R 9 hose is for high pressure fuel injected engines. The R 7 is low pressure line with an estimated two-three year life. The R9 should last at least five years and is therefore recommended for our use even though it costs a bit more. The SAE spec should be stamped on any gas line material you buy or have installed since there may still be old stock around.
or What Do I Do? My GMC Is Too Hot! (or Too Cold!) INTRODUCTION The GMC Motorhome is a big streamlined box made from metal (aluminum), fiberglass and glass. It is no better or worse than any other big box which is designed to keep its inhabitants out of the elements and provide them with a view of their exterior surroundings. It also permits its inhabitants to move from place to place where the exterior environment may vary from cool or cold to hot. As the result of the varied purposes to which we put our GMCs, it provides a compromise while serving its basic functions. Consequently there are some things which it doesn’t do as well as it should. One of these is to function like our stationary homes and provide good or even adequate control of the effects of the exterior environment on its inhabitants. Having recognized this fact of life, what can we do to modify, enhance, improve, alter or otherwise make our rolling box more comfortable? This dissertation discusses in detail just what we have to contend with and what our options are if we decide that we want to change a few things.
BASIC HEAT TRANSFER THEORY Before we can alter our rolling environment, we need to understand the physical principles that are affecting our comfort. This all goes under the heading of "heat transfer". (There are times when it feels like we are subject to cold transfer, but it is really just heat transfer going the wrong direction according to our senses.) Basically heat is transferred from a warm body to a cooler body. This transfer is subject to fairly simple physical laws. However, all heat transfer occurs in one of three ways or combinations thereof. These are Conduction, Convection and Radiation. Conduction Heat Transfer occurs when the warmer body is in direct contact with the cooler body. This is the situation when you put your hand on the hot stove. Heat is immediately transferred from the stove to your hand. Similarly, we can transfer heat from our hand when we wrap it around a cold beer. This is a much more pleasant example of heat transfer - until we hold the beer all afternoon and eventually it warms up to be rather tepid and tasteless. Convection Heat Transfer occurs when a body is exposed to gas (most commonly air) at a different temperature that the body itself. Again heat will be transferred from the warmer source to the cooler air. Radiation Heat Transfer occurs when a warmer body just looks at a colder body (and I don’t mean that icy blond over in the corner). In this case there is no physical contact between the two bodies either by touching or by circulation of a gas (or air.) You have experienced this when you have gone to the beach and acquired a nice tan on a cool overcast day. The sky overhead, heated by the sun, is warmer than your body even though the air temperature is less. Another obvious example occurs with our coaches when we look out through a window at a crystal clear night. We can be enclosed by a nice warm coach and still feel cool on the side that is facing the night sky. In this case we are the warm body and the night sky is a huge infinite heat sink which will soak up our body heat. Physicists have created a bunch of fancy formulae to define radiation heat transfer, but since heat is much like light - just a different wave length, it may be understood simply by noting that reflective or light colored surfaces reflect heat just as they do light. Dark or rough surfaces absorb heat. Consider a dark leather car seat versus a light colored fabric seat as an example. Another factor to be considered is thermal capacity. Denser materials such as leather can hold more heat than a light fabric. It will also take them longer to get hot and longer to cool down. The rate at which they gain or loss heat from a hotter source or material to a cooler material is controlled by how well they are insulated from the other material. HEAT TRANSFER in the GMC COACH All three heat transfer mechanisms, thermal capacity and insulation may be present in our GMC. Obviously if our coach is parked in the sun it will receive heat through radiation. This heat will be conducted through the skin and frame at a rate determined by the insulation present to the interior materials which will store heat according to their thermal capacity. The interior air is then warned through convection. Similarly, the inverse may occur if you are camping in the winter. First, the coach will radiate its heat to the outer environment. Interior heat will be conducted through the poorly insulated walls and frame to the outside and if the breeze blows, cold air will find its way into the coach through all those poorly caulked cracks or loose fitting windows. DEFINING THE PROBLEM While this little article is titled "Theory and Practice of GMC Insulation", there is potentially much more to the overall solution than just insulating. Much has been written on the subject of solar orientation for homes and all the other things that can be done to utilize siting, shading and so-on when planning and building a home. I know this since I have built and lived in several very thermally efficient homes. We don’t have that luxury with our coaches. If we travel actively, eventually we will find our selves either in a hot desert environment such as Desert Hot Springs in May 1996 or in a winter climate like Estes Park in September 1995. In both cases, Mother Nature fooled us with unseasonable weather. GENERAL SOLUTIONS Fortunately, there are a few things which can be done that will help under both extremes. First, we can caulk all the little cracks and openings in the firewall that let the wind blow in as we cruise down the highway. We can employ "windwings" to direct supposedly cooler air into the drivers compartment while we are moving. We can adapt Chuck Aulgur’s auxiliary air intakes and provide a sources of air at our feet (Not recommended for winter driving, however.) We can utilize the original curtain to separate the driving compartment from the rest of the coach so that the dash air has a fighting chance to cool the driver and primary passenger. This assumes that we have tuned up our dash air and made all the modifications suggested by Duane Simmons and Zay Brand to maximize the dash air efficiency. All of these actions will help while we are moving, but how about when we are enjoying our campsites? We can’t always run our roof air units or heaters either because we choose not to pay extra or because the CG doesn’t have the electrical power capacity. Or we are dry camping. Here is where a little advance planning and some work can make a big difference.
For those who have decided that they absolutely have to redesign their coach and gut and start over, there are many things that can be done to help with the thermal situation. First, when the wall and ceiling panels are down and out, voids in the originally installed insulation will be very apparent. These can be filled with cheap polystyrene beadboard, expanding aerosol foam or even fiberglass batt material. Aerosol foam also provides an excellent means of plugging any openings when air can infiltrate. Check for spaces around pipes through the floor for example. If aerosol foam is used, plan on going back after it has cured and cutting it off flush with the surrounding ribs or surfaces. Don’t try to work it while it is still soft. The entire purpose of filling these voids in to cut down on convection heat transfer within the void. Conversely, don’t pack batt material so tight that its small air spaces are compressed. While the wall and ceiling panels are off, these can be used for patterns if they are to be replaced. If a thin material such as door skins or 1/8" marine plywood is used for replacement panels, the backs of these panels can be lined with an aluminized bubble blanket material for additional insulation. Unfortunately, unless there is a dead airspace void behind the reflective surface of the bubble blanket some of the benefits of radiating the heat back is lost. The surrounding materials are in direct contact with the surface of bubble blanket and heat is conducted to that surface. Then the only benefit is derived from the insulating effect of the dead air space of the bubbles. Continuing with the reestablishment of the coach interior, additional insulation can be obtained by the use of a good foam pad under the carpeted area. While vinyl or even parquet flooring may be nice in the galley or bath areas, neither material is a good insulator. You can expect cold feet doing that midnight trip to the john unless insulation is provided under these dense flooring materials. Thin flexible foam such as wrapping material provides a good underlayment for either vinyl or parquet, but it must be cemented carefully to avoid "creep". Light weight carpet materials on the wall and ceiling panels will also provide additional insulation as well as the benefit of sound deadening. So-called "architectural cloth" provides an excellent material to cover wall and ceiling panels. One other thing that will provide significant benefits when truly starting from scratch is to repaint the coach the brightest, shiniest white possible. This will immediately cut solar radiation absorption during the day and radiation losses at night. Materials with the lowest absorptivity or ability to absorb heat or light also have the lowest emissivity which is the ability to radiate heat or light back. BUT I DON’T WANT TO START FROM SCRATCH Obviously, starting from scratch provides the optimum solution to addressing the total problem. However, there are a number of things which can be done to make our coaches more habitable just by recognizing the primary sources of undesirable heat transfer. First, window and door seals can be tightened and/or replaced to minimize infiltration (convection heat transfer). Next consider adding insulation wherever possible. For example, can another pad be placed under the mattresses on the beds? Replace the curtain between the driver’s compartment and the living area with a heavier material. Add awnings on the sides. Place a cover over the windshield and rear window. Even a fairly transparent screen material will cut the solar gain. These little things may help, but the biggest area of thermal improvement lies with window treatments. And this applies even if you start from scratch. WINDOW TREATMENT SOLUTIONS Unfortunately, most of our thermal problems arise because we have these beautiful large glass window areas in our coaches. They are great for looking out as we drive down the road, but they provide major solar heating during the day. At night, considerable conductive heat loss occurs due to essentially zero insulation with a single pane of glass. This is felt when the cold air starts rolling down the glass as the result of convection. Finally we perceive significant heat losses through radiation at night. Well considered window treatments can minimize the effect of these conditions. Should double glazing be considered? Probably it shouldn’t. The expense of replacing the glass with thermal units would be prohibitive even if it were possible. The benefit would be limited anyway. Two part window treatments consisting of shades or curtains and valences will address most of the problems much more effectively. Shades or curtains have the primary function of reducing radiation heat transfer. During the day they can block the heat from the sun from getting much past the inside of the windows. At night they will block your loss of body heat to the great big heat sink of the night sky. If they have some type of reflective surface on the outside, their ability to block radiation will be enhanced. Even so, this isn’t as critical as just having something between you and the glass. Double thickness shades such as "Duettes" have the added benefit of trapping air spaces within the material. Ostensibly this provides an additional insulation so that heat absorbed on the outer surface of the shade is transferred more slowly to the inner surface where it is radiated to the interior. At night the effect is reversed and less interior heat is transmitted to the interior surface of the window and lost through conduction and radiation. The one area of heat transfer that shades by themselves will not address is convection. The hot air generated by radiation within the space and conduction through the glass between the shade and the glass will rise during the day and collect at the ceiling of the coach. Cold air with roll down the window at the night and spill out the bottom and along the sides of the shade. Valences become the second and equally important portion of the solution. Ideally any valence should surround the shade or curtain on top, bottom and sides. It should fit as tight as practical to both the coach wall and the window covering to minimize any air leakage. This is most critical at the bottom in order to block cold air flow down out into the coach. The sides are slightly less critical from a thermal viewpoint, but esthetically are important. The top should not be ignored even if it isn’t visible because of the potential for heat generated between the shade and glass to rise behind the shade and overflow to the ceiling of the coach.
By now it is highly probable that the original curtains on our 25 year old coaches have become faded, sun rotted and need to be replaced. The replacement question becomes one of what and how should these be replaced. Obviously most of us would prefer to use curtains which maintain the original effect or at least complement the interior decor. Curtains provide opportunities for more insulation and, if the have a "millium" or other reflective lining, can cut down on radiation heat transfer unto the coach. However, they are harder to fit to the side of the coach than some types of shades. VALENCES Many coach owners have installed valences along the sides of their shades or curtains to constrain these from hanging out into the living space. The first thing that is obvious during this installation is that the coach side walls are curved and fitting valences is a little tricky. Consequently any custom construction must address the problem.
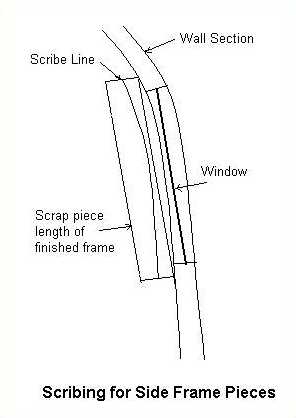
Getting Started: It is highly recommended that any ceiling mounted cabinets be removed first to facilitate measuring for the valences. Note carefully the clearance between the cabinets and the side walls immediately above the window frame or where the shade will hang. Don‘t remove shades or curtains and any window trim until you have measured for the valences. Measuring: Assuming that the shade is mounted above any window trim, measure from the top of the shade track or frame to the bottom. With a pull-up or roll-up shade having a rigid bottom piece subtract a half inch or so from the length of the shade when it is in the down position and being held next to the wall. This is necessary so that the bottom of the shade will fit snugly against the valence. This will give the inside vertical dimension of the valence. Measure the width of the top track or frame again assuming that this extends beyond the window trim. Allowing additional length for operation of any mechanisms a necessary. This provides the horizontal inside dimension. Determine the necessary insidedepth of the valence frame at both the top and bottom. This may or may not be the same depending upon the thickness of the top track or frame and the bottom of the shade or curtain. Scribing: Now comes the tricky part. Cut
a piece of scrap material of the type that you will use for construction
of the valence approximately on inch longer that the vertical
inside dimension of the valence. This should be at least 4"
wide. Place this against the side wall next to the window where
the valence will mount and carefully scribe a line on the piece
to parallel the side wall. Cut along this line and use the resulting
pattern to make the side of the valence. (Note: Do not assume
that the side walls at the front and back of the coach curve the
same way. It may be necessary to scribe the side valence pieces
for each window or even from one end to the other.) Material: It is recommended that the top, bottom and sides of each valence be made from 3/8" thick AC plywood. The face pieces should be made from ¼" AC plywood. Cutting: Rip the top and bottom pieces of each valence using the inside top and bottom depth measurements for the width. Cut these to length adding 1 ½" to the inside dimension. It may be desirable to bevel the top piece so that it fits the slope of the side wall. Determine whether you want the outside edge of each vertical side of the valence to be straight or generally follow the curve of the side wall. The latter probably will look better and reduce the projection into the living area. Use the previously scribed pattern(s) to trace this cut line on the side pieces of the valence. Determine if you want the top and bottom of the valence to be perpendicular to the side walls or to project out straight and essentially horizontal. In this case it may be desirable to cut the side pieces to the inside dimension at an angle. Mark with a bevel square according to your choice. Mounting Brackets: Use a minimum of two 1" angle brackets on the inside of each inner frame piece. Attach these to the various pieces approximately 9" to 12" from each end. Be sure that this location does not interfere with the mounting brackets for the shades or curtains. These brackets can be attached on the inside with small screws or "pop" rivets so that they are flush with the back of each piece of valance. If you intend to have the top and bottom project out horizontally from the coach wall, it will be necessary to bend these brackets so that they will be flush with the wall surface. Assembly: At this point these valence frames can be assembled using glue and brads. Or they can be upholstered first and then assembled. It may be easier to upholster them separately, but if so, the upholstery must eventually be wrapped around the corner joints. We have found it easier to work with an assembled frame even thought they will be flimsy unless you used ½" or thicker material. (Note: With ½" or thicker material adjust the length of the of the top and bottom accordingly.) Don’t worry. The remainder of the installation provides the necessary reinforcement. Upholstery: The entire frame (or separate pieces) should be wrapped with a thin (1/8" or so batting material. This provides not only insulation, but it also helps seal the frame to the coach walls. Then wrap the padded frame with the material that you are going to use and secure the seam and ends using a hot glue gun. The seam should be at the back of the frame where it will be hidden against the wall or at the front where it will be hidden by the face frame. Use hot glue sparingly to avoid lumps. The ends should be folded carefully to the inside. It will be necessary to carefully cut a slit where each bracket projects through the padding and final cover. Face Frame: The Face frame pieces can be ripped to a width of 2 ¾" or wider if desired. The top and bottom should be cut the length of the inner frame outer dimension. The side pieces should be cut to the length of the height of the assembled inner frame less the width of the top and bottom face frame pieces. If there is a significant curve to front edge of the inner frame, it is desirable to measure along the surface of the curve. Measuring across the height of the frame may indicate a slightly shorter height than is desirable for the finished face frame. Upholstering the Face: The individual face pieces can be wrapped with padding and then upholstered with the selected material. Another approach which worked well for us was to make "tubes" of the material twice the length of each face piece and slide these over the pieces. This provides a gathered look to the face pieces. The gathers will tend to hide the brads which are used to secure the face to the inner frame. In either case, the ends of the tubes should be wrapped over the end of the frame pieces, folded to the inside of the piece and hot glued carefully. Assembling the Face: While it isn’t necessary to assemble the frame prior to installing, it is somewhat easier if the frame is assembled first. The finished frame pieces can be joined with flat mending brackets at the joints using small screws or "pop" rivets. The side pieces butt to the top and bottom pieces. Installation: First secure the inner frame to the wall of the coach by screwing through the correctly angled brackets into the wall substrate. The reinstall any window trim removed previously. Ideally, the window trim will hide the angle bracket where they are attached to the wall. The shade or curtain can be replaced next. The face is then attached to the inner frame with 1" brads approximately every 4" to 8". If these are pushed in behind the gathers of the face material, they will be hardly visible. These also may be painted to match the face material before installation. This works particularly well if a pneumatic brad nail gun is used. If it is necessary to bow the face in to fit the curvature of the side inner frame, you willneed to secure the top first and then work down each side face while holding the face against the inner side frame. Angling the brads will provide better purchase for them. Don’t worry if an occasional brad comes out of the wood under the padding of the inner frame pieces. It won’t show. Be sure that any draw cords are not behind the face when it is secured. Finish: You’re done. With the shade down or the curtain closed you have effectively blocked radiation heat gains or losses. You have trapped convection flow behind the assembly and you have minimized conductive heat transfer through the windows. Sit back and enjoy! Rear Window: The rear window can be treated
the same way except that both the top and bottom inner frame pieces
must be scribed to match the curvature of the coach end wall.
These pieces and the side pieces will, of necessity, be much wider
than the side wall valences.
on Your GMC Coach? by Bill Harvey, GMC Western States For years GMCers have been considering upgrading our coach braking systems with all-wheel disk brakes, but the price has been prohibitive. Now, thanks to the eagle eye of the GMC Western States Technical VP, Frank Condos, it is economically possible and practical. Frank noted that hot rodders and four wheelers have access to all wheel disk brakes through a small independent manufacturer located in Colorado. The Streetrod Manufacturing Company, Inc. (TSM Inc.) has been producing bolt-on front and rear disk brake kits for Ford, Chevy, GM, Chrysler, Toyota, Jeep and even Jag cars and off road vehicles for the past several years. TSM is a small two man shop started by mechanical engineer, Cliff Jones, as the result of his experience building and racing streetrods and 4WD trucks. The fact that the shop is small but with a very well equipped machine shop says a lot about the quality. This is not a production line situation. This was further evidenced by Cliff’s willingness to consider equipping a GMC Motorhome with rear wheel disk brakes just to see if it could be done. Since we couldn’t find the necessary wheel and hub to check sizes, I volunteered my coach as the test bed. I should note that I had had Ray Curtis install the "Anstett" brake system over a year and a half ago and was very pleased with the system. I felt that the coach "stopped like a car", but it was in the interest of GMCers to try the rear wheel disk brakes. Everyone knows that disk brakes have many advantages over drum brakes primarily because they cool more quickly. This makes them better for heavy braking, high speed stops, multiple braking, trailer towing and mountain driving. The latter is a major factor here in the west. Disk brakes have the physical advantages of being self adjusting, self cleaning and have less rotating weight than drums. Pads are much easier to change than brake shoes. And disk brakes provide more consistent, even braking than drum brakes. TSM can provide complete kits for one or both rear axles for $610 for the front rear (mid) axles and $590 for the rear axles, plus shipping of course. These kits include rotors, spacer plates, calipers with mechanical parking brake fittings, high performance pads, caliper brackets, necessary hydraulic hoses or lines and Grade 8 bolts and washers. The competent mechanic should be able to install each axle in a few hours, including the time it takes to bleed the brakes and readjust the parking brake. Do you need disk brakes on both the mid and rear axles? It has been argued correctly that the mid axle brakes provide most of the braking for the rear end. However, to obtain the primary advantage of disk brakes, i.e., lack of fade for continuous braking, it appears better to have disks mounted on both the mid and rear axles. Otherwise the rear axle drum brakes may overheat and cause boiling of the brake fluid with resultant brake pedal softness. (For that matter, it might be better to disconnect the rear axle drum brakes and plug the line if you are going to mix the systems.) In as much as rear axle disk brakes are not subject to the loading torque of the mid axle, it might be better to either use smaller pads or proportioning valves on the rear axle to reduce the tendency of these lighter loaded brakes to load up and skid. This is a good place to provide the standard disclaimer: What you do to your coach is your business. Neither the writer, GMC Western States or TSM, Inc. assumes any responsibility for your installation of the brakes or their performance. I have attempted to present the pros and cons of disk brakes, but it is up to you to determine if you want to continue with your OEM brakes, upgrade with the "Anstett" system, add disks to the mid axle only or go all the way with all 6 wheels. If you have or can get calipers and pads, TSM will subtract $280. If you don’t want parking brake calipers, you can save another $180 per axle. By the way, the difference in price between mid axle and rear axle kits ($20) is based upon the need for new metal lines to the calipers. I recommend that you call Cliff and discuss your specific needs with him. There are some things that can be done with the parking brake to clean up the system. You’ll find that he is willing to take time to discuss the installation and answer questions. (I suspect that Cliff and his assistant, Skip, may be in the market for GMCs one of these days.) TSM can be reached at 303-688-6882 or fax 303-660-4660 or email: tsmmfg@aol.com.
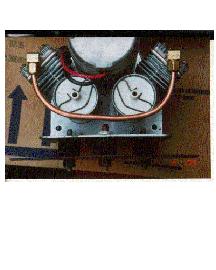
The hose which connects the two cylinders weakens over the 20-plus years and can "blow" off one of its fittings while raising the suspension from a low setting. You can try to re-clamp the hose, but the inside of the rubber hose gets damaged when it comes off the fitting making it impossible to re-use. One solution is simply to replace the hose with a new piece and new hose clamps. Another more permanent solution is to go to your local plumbling supply or hardware store and get 2 90-degree 1/4" mpt-to-1/4" compression fittings and either a foot of 1/4" copper tubing or a foot of 1/4" air line (the same kind you use for the air bag lines). If you use the air line, you'll need to buy two 1/4" compression sleeves for the ends. Replace the original hose barb fittings with the new ones by unscrewing them from the compressor cylinder heads, bend the tube into a gentle "U", and connect everyting. The fix is permanent and costs less than $5.
Al Singleton is presently researching the use of an industrial coating currently available on the open market. The material comes in some colors, is a sprayed application requiring some professional surface preparation, has an elasticity factor of 400% and is paintable with Imron. This indicates it will accept the linear poly-urethanes used in automotive finishes that are current applications, also. There are shops out there currently using this material on other makes of motor homes successfully in re-roofing applications with good success. It bonds to both aluminum and fiberglass well. It has a very attractive price structure, running at about 30% of the cost of re-roofing vehicles with fabric reinforced rubber roofs. Al is working with a vendor in Oregon that is doing work in motor home applications. Research will develop the thickness of the coating in mils, the weight it will add to the coach, what the elasticity does to the appearance of the coach (paint "popping" and/or cracking at seams from body flexing), visual detectability of the application as it affects cosmetic appearances and many other points of technical interest. It is not an environmental problem. It is used in contact with foods and consumable liquids without restrictions from FDA, so it should be nontoxic. Al will follow up on this. Stay tuned! 1-15-00 Update: At the present, there is nothing to report, as there has yet to be reported any failures, ie, cracking, peeling, color change, seam failures from fatigue, or other "weathering" short-comings. |