 This
tech issue is going to be a mixture of several short subjects
relating to maintenance, improvements, safety, and a few other
things. I hope some of them will be of interest to you:
This
tech issue is going to be a mixture of several short subjects
relating to maintenance, improvements, safety, and a few other
things. I hope some of them will be of interest to you:|
|
|
|
|
|
By Chuck Aulgur
This
tech issue is going to be a mixture of several short subjects
relating to maintenance, improvements, safety, and a few other
things. I hope some of them will be of interest to you:
The material presented in this document is based on my personal experience. It is my viewpoint and does not represent authorized data pertaining to the GMC Motorhome. It is the responsibility of the readers to establish their position associated with this subject in relation to any vehicle repair and/or modifications.
Maintenance
With the exception of people living in the southeastern and southwestern
states, your trusty old GMC has probably been semi-retired for
the winter. No matter where you live, now is a good time to take
a look at your GMC maintenance logbook or service records, and
see what needs to be done before spring travel begins. Most of
us who purchased used GMCs, and started attending the various
GMC club rallies, were soon made aware of the critical items that
need special attention to prevent serious and costly problems.
Most of us got scared out of our pants at our first rally and
got these items taken care of in due fashion, and a few sold their
coaches as soon as they returned home. A high percentage of GMC
owners are senior citizens, like myself, and we find that time
passes faster and faster as we enjoy our retirement years, and
some of us have a few "senior moments" along the way.
As I was looking through my GMC logbook recently, I found it
hard to believe how long it had been since I last attended to
some of the critical items. If it happened to me, maybe it is
a good time to remind everyone to take a look at his or her maintenance
schedule. Another thing that I have found helpful over the years
is about once a year, when there is a rainy day and I don't have
anything important to do, I skim through all the past GMCWS and
GMCMI newsletter tech sections and the Cinnabar GMCMHN quarterly.
I usually find something of interest that helps solve some current
problems or it reminds me of some-thing I need to do.
Front Wheel Bearings:
One of the most critical items on our GMCs is probably the front
wheel bearings. If your records show it has been more than 25k
miles since you serviced them, you need to take care of them soon.
If you burn out a front wheel bearing while traveling at highway
speeds, you are talking about some big bucks. I know from personal
experience that you can lose a front wheel hub, the brake disc
and pads, the knuckle, and even the drive axle. This all happened
to us the first year we owned our current GMC. The previous owner
said he had just replaced the front wheel bearings, so they were
one of the few items I didn't bother to check, how-ever, they
failed in less than 10k miles. They were the old type S-23 Bower
bearing. The newer higher load-rated bearing that has been available
from Cinnabar for several years helps this problem considerably.
However, they still should be serviced or replaced approximately
every 25k miles. With periodic re-lubing, some people have gotten
over 100k miles on these bearings, but they are usually people
that do their own work and are not concerned about labor cost.
My recommendation is to just replace the bearings as their cost
(less than $100) is minor compared to the cost of a bearing failure.
If you are having your bearings replaced at a repair facility,
and you want the extra security of the 20 percent more load-carrying
capacity, make sure you specify GM P/N 12351677 as they may install
the less expensive generic set S-23 bearings.
Rubber Products:
Another critical item that should be looked at is how long it
has been since the rubber products were renewed. These include
the fuel line hoses, the radiator hoses, the oil cooling line
hoses, the power steering hoses, the engine v-belts, and the vehicle
tires. The industry standard recom-mends that these rubber products
be replaced at least every seven years. It may be required much
sooner for the fuel line hoses, as the fuel we are now burning
is said to be extremely hard on the rubber hoses. Also, if you
have an auxiliary transmission oil cooler that was installed using
rubber hoses, make sure the hose is designed for that usage.
I have seen regular fuel line hoses used for this application.
A hose that is not designed for this high tem-perature and pressure
application can get soft and fail in a very short time. When
you replace your fan belts make sure you get 12-mm-wide belts.
A lot of the belts being sold for our GMCs are only 11-mm and
ride to far down in the v-pulley. Good-year is one company that
still makes the 12-mm belts.
A lot of us can speak from personal experience as to how much
it cost to repair the damage caused by tread coming off a tire
when traveling at highway speeds. In my case, I had four Michelin
tires with non-steel sidewall cords that were less than five years
old, fail on one trip - the coach damage was over $2000. Take
a look at the date code on your tires and you may be surprised
at how old they are. The date code is shown as three numbers
- the last number indicates the last digit of the year and first
two numbers indicate the week they were manufac-tured in that
year (246 indicates the 24th week of 1996 - assuming they are
less than 10 years old). If the age is approaching seven years,
it's time to see the tire man. If the tires are not all-steel
cords, the recommended life is about four years or less.
Probably the most critical rubber product on our GMCs is the engine oil cooling line hoses. If one of them fails while driving, it can easily destroy an engine in a very short time. There are a lot of GMC owners that can attest to this. When replacing these hoses, use the OEM material as higher pressure hoses tends to be much stiffer and can cause excessive loading on the structurally weak radiator fittings causing them to fail.
I can hear a lot of you thinking, why is he wasting our time telling us all this stuff we already know. My only point is to remind you to look at your records and see what critical items need replacing before it provides info for another horror story in the GMC Motorhome Marketplace.
Carburetor: The carburetor and intake manifold are items causing a lot of problems on high-mileage engines. If you are experiencing hard starting with a cold engine, or long delays in coming off of fast idle, it is probably due to improper automatic choking. Remove the side cover from the automatic choke and take a look inside. If you see a lot of carbon buildup, you most likely have a hole burned in the heat tube assembly (item 8 in on page 8-9 of 78Z parts book) similar to what is shown in Fig. 1.
This heat tube is exposed to exhaust gases and the tube burns through after a lot of miles. When this happens, exhaust gases are forced up into the choke area which soon causes it to malfunction. The carburetor choke assembly will need to be cleaned and the heat tube assembly replaced. When you replace the tube assembly, you may want to modify it by adding a piece of stainless steel similar to what is shown in Fig. 2. The added stainless steel plate should be as large as you can get through the hole in the manifold and is welded to the heat- tube-mounting flange.
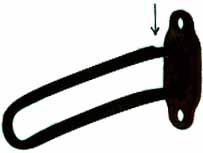
Fig. 1. Heat Tube Assembly

Fig. 2. Heat Tube Assembly With Stainless Steel Plate
Almost everyone who removes their carburetor and inspects the intake manifold find them cracked in the area between the large secondary carburetor ports. The crack does not cause a problem until it extends down into the bottom section of the mani-fold. When this happens, exhaust gasses can leak into the intake manifold. The reason for installing the modified tube assembly with the stainless steel plate is to block most of the exhaust gasses going through the passageway under the carburetor. The manifold is exposed to too much heat in the area under the carburetor which causes it to crack over time. By blocking most of the exhaust gasses it may prolong the useful life of your manifold. People who are familiar with this problem are blocking off most of the flow through the exhaust passageway going under the carburetor when they have their intake manifold repaired or replaced. I have heard there is a com-pany that makes intake manifold gaskets for our engines used in boat racing applications that has the exhaust port going under the carburetor blocked off. However, I don't know the company name. If any of you know about this gasket, please let me know, as it would be helpful to our club members. If you happen to run across a used intake manifold that is not cracked, I recommend you obtain it for a spare - they are getting very hard to find.
Improvements
Radiator Guard:
When I attend GMC rallies, I normally walk around and look at
all the other coaches to see what improvements or modifications
other people have made. I am always amazed to see how many coaches
are still being driven without a guard on the lower part of the
radiator. One of the things that attract us to the GMC is their
lowness to the ground. Unfortunately, this can cause a serious
problem as the lower 1/3 of the radiator is exposed to flying
objects kicked up from the road. A small rock can knock a hole
in the radiator and cause the coolant to leak out while you are
trucking down the road listening to the stereo, or watching the
country-side pass by instead of watching the temperature gauge.
It doesn't take very long to overheat the engine to the point
a head gasket is blown and/or the heads are warped or cracked
beyond repairs. It is getting extremely hard to find serviceable
used engine parts for these classic coaches, so it be-hooves us
to take good care of what we have. This can all be avoided by
placing a protective screen in front of the radiator. A 36-inch
wide by 18-inch long piece of one inch expanded metal, covered
in front with ¼-inch square mesh screen and attached between
the lower radiator support frame and the forward vehicle cross
member, can prevent a serious problem. Bend the screen up in
front of the frame cross member so it covers the large holes.
Bend the lower end horizontal where it goes under the radiator
support frame. Attach it using a few fender washers and ¼-inch
metal screws. Drill the screw holes in the radiator support frame
very close to the front edge so as not to damage the radiator.
The expanded metal can be purchased at metal supply stores or
at metal salvage yards. You can also purchase it at Home Depot,
but you may have to make it out of two 18-inch square pieces as
they only stock small pieces. It only cost a few dollars and
a little time, but it may save you hundreds of dollars. The ¼
square screen (sometimes called chicken wire) is not adequate
by itself. I had a piece of truck tire tread knock a hole through
a ¼ -inch square screen wire and severely damage a new
radiator core. Do not use window screen wire for this application
as it can severely block airflow to the radiator.
Rattles:
If you have noticed that your GMC has more rattles than in its
younger days, it is most likely due to degradation of the insulating
material between the coach body and chassis frame. The 73 through
mid-76 coaches came with a continuous strip of rubber between
the chassis frame and the coach body as shown on page 23-76 of
78Z parts book. Mid-76 and later coaches came with twenty separate
pieces of rubber located at the points where the body floor cross-members
pass over the top of the chassis frame side rails. When I examined
our coach some time back, I found six of the twenty insulators
were missing, and another four were only partially in place.
After I installed all new rubber insulators, I found it hard to
believe how much improvement it made - I thought we had a new
GMC. The old insulators that I took out were as hard as a rock
making a rigid connection between body and frame instead of a
soft one, so it's no wonder the dishes were rattling. It is not
an easy job to replace the insulators, but it is well worth the
effort. What I found that worked best was to jack up one side
of the coach to the point both the front and rear wheels were
on the verge of leaving the ground, then place jack stands under
the frame. There are two hold-down brackets on each side of the
coach located on the outside of the frame rails, that have to
be unbolted to allow the body to be raised sufficiently to unload
the insulators. Each bracket has two carriage bolts that go down
through the plywood floor. You will need to apply liquid-wrench
or a similar material to the bolt nuts, starting several days
before you try to remove the nuts, as they are rusty, and it doesn't
take much torque to turn them in the wooden floor. The bolt heads
are most likely inaccessible from inside the coach. Once these
hold-down brackets have been removed, start at the front end of
the frame and place bottle jacks under the first two floor cross-members.
Jack the body up until there is approximately ½ -inch
clear-ance between the front cross-member and the frame. Remove
the old insulator and thoroughly clean the frame and cross-member
surfaces with a solvent. Coat both surfaces and the new insulator
with 3-M weather strip cement and install the new insulator in
the first position. Remove the first jack and place it under
the third cross-member and again jack up the body and replace
the second insulator. Repeat until all the new insulators have
been installed. Using two jacks makes the job much easier because
you don't have to do as much jacking once the body has been raised
to the point where is about to be lifted off the frame. When
one side is completed, repeat the same procedure on the other
side, and you will have a much quieter-riding coach. You can
purchase new insulators (P/N 2005279) or make them yourself from
5/16-inch thick sheet rubber cut into 3x6 inch rectangles. You
can purchase sheet rubber in larger cities at commercial rubber
supply houses in hard, medium or soft density - I used medium
density. It would be very difficult to replace the continuous
insulator on the early coaches without removing the body from
the frame. However, you can use the same above procedure by removing
the old rubber under the body cross-members and inserting a new
piece in its place. The remaining sections of rubber lying between
the cross-members are not supporting any weight, so there is no
reason for it to be changed.
Safety
A lot of us GMC owners have added new gadgets and appliances with
sensitive electronic controls such as computers, microwave ovens,
television, radios and numerous safety monitoring devices. If
these items are subjected to power surges, either from the Onan
generator operation or shore power, they can be severely damaged.
Adding a perma-nently mounted surge suppressor to the main circuit
box can protect all of the items in your motor home. These units
can be purchased at electrical supply stores in the range of $25
to $60, depending on what brand they carry. They are designed
to be installed in a home electrical circuit breaker box with
two 110-volt circuits. However, they will also work in our motorhomes.
They are small units around 4 cubic inches in size, with a 1/2-inch
male fitting designed to fit through a 1/2-inch knockout in the
breaker box. One ground wire is connected to the circuit breaker
box ground terminal. The other two "hot" wires connect
to two different circuit breaker output terminals. Coaches with
GM interiors have 50-amp shore power with two 110-volt lines coming
into the circuit breaker box, each going through a separate 40-amp
main circuit breaker. The surge suppressor wires are connected
to the output terminal of one circuit breaker downstream of each
main circuit breaker. The Royale and Birchaven coaches have 30-amp
shore power with only one 110-volt shoreline coming into the main
circuit box, and one 110-volt line coming from the Onan generator,
each going through a separate 40-amp main circuit breaker. The
two "hot" surge suppressor wires can be con-nected to
the output terminal of any two of the line circuit breakers downstream
of the main breakers, or you can just cap one of the wires. The
arrows in Fig. 3 and Fig. 4 below point to two different brands
of surge suppressors mounted on two different circuit breaker
boxes; Fig. 3 is a GM interior and Fig. 4 is our Royale interior.
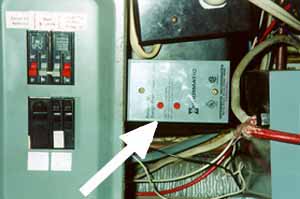
Fig. 3. Surge Suppressor on GM Interior Breaker Box
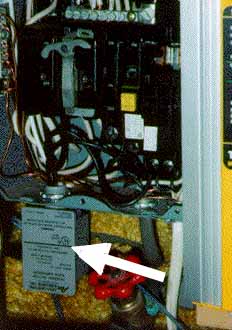
Fig. 4. Surge Suppressor on Royale Breaker Box
This may all sound a bit complicated, but it really is a very simple installation. The units come with a good wiring diagram and it should take less than one hour to install one, and it could save destroying an expensive electronic unit somewhere down the line.
Attention
I have received very little information or questions in the last
three months as to what you members want to see covered in this
tech section. One could assume that you have no items that you
want discussed or answered, so maybe there is no need for this
tech section. It takes member participation to make this club
effective. Let's get that snail-mail,
e-mail or telephone in operation!
 |
 |
 |
|
Chuck Aulgur, Technical Vice President, 9805 Ogram Dr., La Mesa, CA 91941 Phone: (619) 465-9875 E-mail: cwasdc@juno.com |
|
|
|